Correct Riding Position...
ALWAYS REMEMBER TO WEAR YOUR RIDING HELMET WHEN ON A HORSE!
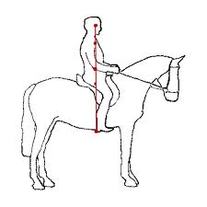
Here, the correct seat is when the rider's shoulder, hip and heel are in straight line.
When riding, keep your head up and your eyes looking forward - in the direction of travel. If you start looking towards the ground, your whole body will start to lean forward, you won't be able to see properly to steer the horse safely, and you'll almost certainly find yourself back in the armchair position.
The position of feet should be -- The toe should be upwards and the heel should be downwards.
The Position of hands should be-- Hold the reins from the edge of the saddle.
The position of arms should be --Arms should be closer to the stomach.
so the conclusion is that :
1).Head should be straight (looking ahead from the ears of horse).
2).The shoulder-hip-heel should be in straight line.
3).Toe up and heel down.
4).The Calf and the knee should be attached to the horse always
Balance, Feel and Rhythm
Balance
All that is required of a rider seated centrally and in balance on a horse are subtle aids that are almost invisible to the onlooker. A well balanced rider results in a well balanced horse, thereby more responsive and alert. The more awkward the seat, the more awkward the aids; the more refined the seat, the more refined the aids. It is the classical seat that can lead to perfect balance on a horse, as will be described later in detail.
Gravity
Gravity should help you remain in the correct position, or it can help you crash to the ground, which is why it should always be used to your advantage. Sitting on a horse with the legs too far forward disturbs the vertical line of gravity. Lets imagine standing stationary on the ground. We will find that we are in balance. If we try to stand with our legs forward or backward, it will be impossible to maintain any balance. The same principle applies on horseback, a weak seat with wrongly positioned legs is not a balanced seat.
It is not right to simply say that balance should be maintained on horseback as is it maintained on the ground. Obtaining balance over a horse's constantly changing center of gravity takes time to learn. By practicing the correct position on the ground in front of a mirror, you can form a visual image of how you should look like when seated on a horse. Grasping on to that image, try to imitate it the next time you're mounted. Feel the gravity flowing through the checkpoints of your body. Let your legs grow long, as though reaching for the ground. Sit upright, as though reaching for the sky. This is a natural position, so breathe deeply and relax any tense muscles.
It is worth mentioning that short stirrups make a classical seat virtually impossible. Showjumpers often ride with shortened stirrups as it helps their legs absorb the shock of the jump. Shortened stirrups misplace the legs in a forward position for the dressage rider. It is advisable to sit in the classical position, letting the legs hang loose and long naturally, then lengthening or shortening the stirrup to complement the length of your legs.
A common mistake is to relax completely. An upright position would not be possible if the whole body was to relax. The spine must always support the upper body, so it must remain perpendicular and erect. The trick is to relax the lower body. Think that your body, from the waist down to your legs, has become part of the horse, while the upper half must remain upright and supporting itself.
The Legs....
Introduction
We are becoming more and more aware of the benefits of a good posture while sitting, walking, jogging, etc. And we are aware of the harmful effects of a bad posture. Fitness and health experts advise us of walking with our backs straight and shoulders square. Rounding the back and dropping the shoulders causes muscle strain and back problems. A person with a stiff hip joint may walk from his knees- i.e. bending the knees without much movement from the hip joint. Since the human skeleton is all connected through joints and ligaments, a rounded back restrains the hip joints from moving to their full potential. Their full potential, however, is not necessary for a good posture. Gymnasts, ballet dancers, circus acrobats, and many others are able to use their muscles and skeleton to their full potential. As riders, such degrees of suppleness are not required of us to sit correctly and in harmony with the horse.
To reach a fair degree of suppleness in the hip joint, a good posture in the ground would be essential. Walking from the hip joints, rather than from the knees, can help supple the area. Maintaining a good posture on the ground will lead to a naturally good seat on a horse. When standing or walking, keep your back straight and your pelvis in its upright position. Keep in your mind the checkpoints that connect the vertical line of gravity, as it applies both on horseback and on the ground. As mentioned previously in The Classical Seat section, the line of gravity begins on the ground, and is carried on to place you in the correct position on horseback.
On The Horse
After ensuring that you are sitting deeply in the saddle (by lifting the thighs away from the saddle), bend your knee and bring your heel up to hold it in your hand. Hold your leg in this position for a few seconds to stretch your hamstrings, then slowly drop it. This should place your leg in an almost straight position. Now, as subtly as possible, shift your thigh only a very small distance forward, and relax your leg. Repeat the exercise with the other leg. Provided that your pelvis is upright and your back is supporting itself, you should now be seated in the classical and most ideal position. Your legs should be bent slightly at the knee, not stretched uncomfortably straight. Your stirrups can aid in keeping you in this position but being just long enough to rest the ball of your feet higher then your heels. Riding without stirrups will help the legs hang longer, which will result in lowering the stirrups a couple of holes. It may help to watch grand prix dressage riders, as their legs appear to be longer than they actually are, while they are only letting them relax in the most natural position.
"Spreading the buttocks to form as broad a base underneath you as possible is very important as it will allow the leg to hang unconstricted.. ready to embrace the barrel of the horse."
The Upper Leg
The main function of the upper leg is, working in conjunction with the pelvis, helps keep you in the proper position. Since we have, mentally, already separated the trunk from the pelvis, it is time to connect the pelvis to the upper leg, imagining that they have both become part of the horse. Beware that a sensitive horse will be able to detect the slightest tensing of muscles, therefore, it is not favored to contract or tense up the thigh muscles to provide a secure seat. If the thigh is in the position described above, its mere weight will be enough to maintain the secure and deep seat. It is amazing to know that it is quite possible to hold a piece of paper between the thigh and the saddle without any gripping from the rider if he is seated correctly!
The Lower Leg
The function of the upper leg has been identified. Now the lower leg has to work independently from the upper leg. The lower leg's purpose is the application of the aids. The lower leg should also lie closely against the horse, but contracting the calf muscle to do so must be avoided. In fact, tensing the calf muscle will cause the knee to turn outward, which will, in turn, lead to loss of contact between the thigh and the saddle. The same principle applies to the lower leg, gripping contradicts the classical seat, and therefore the legs must lie closely yet relaxed around the horse. The foot is to 'rest' in the stirrup without any conscious effort. Be careful of pushing down with your heel to keep the stirrup, as this has a tendency to shift the lower leg into the chair seat position (leg forward). The weight of your leg is sufficient to keep the heel lower than the toes, thus, the stirrup can be regarded as a foot rest.
The Leg Aids
The aids provided by the lower leg can be summarized in the words of Sylvia Loch in her book, The Classical Seat:-
"As well as activating, the lower leg also supports, directs, limits, controls, encourages, allows, and makes possible every variation of turn and of forward, lateral, backward, and, in haute ecole, even upward work of the horse in all gaits."
An aid should be viewed as a helping hint, instead of a command. Leg aids should be in the form of a caress. Kicking, nudging, and squeezing for prolonged periods will make a horse less and less responsive, eventually growing numb to your aids. A horse can feel a fly on his belly. Violent aids are not only uncomfortable for the horse, but are tiring for the rider, confusing for the horse, visually disturbing for the onlooker, and limit the variation of aids provided by the lower leg.
The leg, applied just behind the girth, asks for impulsion. In the shoulder-in, the inside leg applied in this manner allows the horse to bend around the leg and maintain impulsion. In the half-pass, it serves the same purpose. When stationary, a slight pressure from the thighs can move the horse into walk. To trot, a gentle caress with the lower leg should be all that is necessary. For a proper transition into canter, the inside leg activates the forward motion.
Applied approximately three inches behind the girth, the leg asks for sideways movement. A single caress, however, merely supports the hindquarters from swinging outwards. For instance, for the half-pass, the inside leg is applied on the girth, and the outside leg behind the girth asks the horse to step laterally. In association with shifting the weight to the inside seat bone, the horse will bend around the inside leg, step away from the outside leg, and move his center of gravity under your new center of gravity (the inside seat bone).
It is said that the pressure applied behind the horse's elbow (just before the girth) frees the elbow and encourages the horse to swing his forelegs forwards actively to extend the pace, provided that impulsion is already achieved. The aid should given with the toe, and the leg must return to its original position once the horse responds.
The Leg aids should always be applied with empathy and understanding. Remember that you should relieve the pressure as soon as the horse responds as this serves as reward for his reaction.
The Hands...How to Use the Hands
Our seat and legs create the energy, our hands fine tune that energy. The hands carry out a polite conversation with the horse through the reins, and should never force or pressure the horse into obedience. The reins should therefore be considered a tuning aid rather than a steering wheel.
Many riders practically ride with their hands. The weaker the seat, the stronger the hands. A deep, confident seat banishes the need of strong hands. We often hear instructors speaking of maintaining contact. But little do they speak of how to maintain contact. Contact may simply be defined as avoiding slack in the reins. With an advanced schoolmaster, the mere weight of the reins would be sufficient to maintain contact.
'Hard' hands transfers a heavy horse on the forehand into a very heavy horse on the forehand. Hard hands are hands that do not yield. Locking your wrists and elbows into one position disturbs the natural balance of the horse. You can force the horse into a nice outline with hard hands, but the horse will never be going forward with impulsion and elasticity. Only a few horses can be harassed onto the bit; most horses will rebel. The rebellion can be in the form of neck flexion, hollowing the back, and tossing the head high in the air, or it can be in the form of leaning and pulling on the rider's hands. This transforms a harmonious ride into a battle, with the horse most likely to win.
We often see horses with the habit of leaning and pulling on the rider's hands, no matter who the rider is. This habit was developed when the horse has learnt from one rider that the hands cannot be trusted. But there is hope. . . even this habit can be cured through sensitive and empathetic re-schooling.
"Never pull on the reins and you will always have pleasant, manageable, horses that are easy to ride."
Mouthing the bit will allow the horse to salivate, making him lighter and softer in the hand. By 'talking' to your horse through the bit, finger the reins lightly. A simple, almost invisible, give and take with the fingers acts as though you were conducting a conversation of whispers with your horse. Be careful not to overdo it, otherwise the conversation may distract the horse from the main task. This sponging action on the reins can be done while hacking, walking, or taking a breather. It helps the horse to relax his jaw without anticipating the next movement.
When a horse pulls or leans on the rider's hands, the best action would be to ride more positively with the seat and legs. Bring your back a couple of degrees behind the perpendicular to strengthen to seat, and drive the horse forwards with your legs. Keep the hands light, even allow the horse to take the reins, but never pull back. Soon the horse will learn that he has nothing to fear of the bit in his mouth, and that he cannot let the rider carry his weight, rather he should carry his own weight.
The Right Position
Ideally, the upper arms and elbows should remain in the vertical line of gravity, comfortably resting by your sides. Carrying your upper arms and elbows in front of the vertical upsets the flow of gravity through the checkpoints. Imagine walking with your upper arms and elbows in front of you, as if you were pushing a supermarket trolley. Would you feel balanced? How about holding this position while jogging? The weight of your arms will drive you forwards. It is almost impossible to carry your arms in this manner on the horse without exerting a certain amount of pressure on the horse's mouth. While you're sitting down now, hold your arms in front of you as though you were pushing a supermarket trolley. How long can you maintain this position? Not too long without some kind of support, right? In the saddle, the reins act as a support for the arms.
It is more natural to carry your upper arms by your sides, after all, the classical riding is all about natural balance. Do not grip with your elbows because this will not allow freedom of the horse's jaw. Be sensitive in your fingers, and give with your elbows.
Many books stress the importance of maintaining a straight line from the elbows to the horse's mouth. This is very much true. Lowering the forearms too much makes it difficult to ease on the reins. A straight line from the elbows to the horse's mouth increases sensitivity both in your fingers and in the horse's mouth. Do not drop your wrists, or rotate your fists to face the ground. Keep your wrists aligned with your forearm and your thumbs at the top. The reason for this is that this position gives the greatest amount of 'feel' to both the horse and yourself. The slightest movement from your fingers will be felt by the horse, and vice versa. Aids will become more refined, and the ride will feel and look truly harmonious.
Do not clench your fingers into a fist. Instead, relax your fingers and keep them open. This way, a simple closing of the hand (combined with seat and leg aids) will be enough to perform a downward transition. The next section will deal with combining the back, seat, legs, and hands, to achieve different results with your horse.
The Seat during Action...
It is nowtime to see how the things we discussed above are used together to bring out the best of your horse.
Shoulders Behind The Perpendicular
The secure basic position has been explained with a perpendicular pelvis with a 0° tilt. There are occasions when the pelvis, back, and shoulders can actually tilt approximately 10° behind the perpendicular. This angle strengthens the seat, provided your legs remain in their position, unaffected by the rotated pelvis. Adopting this position can occur under the following circumstances:
- The heavy horse: If the horse is heavy on the forehand and is leaning on your hands, adopt this position to push the horse forward with your seat bones. When the horse steps underneath him with impulsion, he will become lighter on the forehand, then you will be able to return to the basic position.
- Extensions: Since this position encourages the horse to step forward, it can be used to help the horse to extend in any gait. If you watch dressage riders at a competition, you will notice that most of them bring their shoulders behind the perpendicular to extend the pace.
- The lazy horse: When the horse is ignoring your leg aids, strengthen your seat through this position to get him up and moving.
- The sitting trot: Particularly in the medium and extended trot, tilting back will help you sit smoothly to this bouncy gait. Beware, however, of constantly sitting in this manner to the trot as this has a tendency to damage the horse's back. It is only helpful if you are learning to sit to the trot, and you want to get a feel for it.
Use Of The Seat Bones
The seat bones can be used to extend or collect, and for lateral work. Their benefit to push the horse forward has been discussed above. But there are other benefits to the seat bones as well:-
Transition to canter:
Horses often respond to the canter aid by cantering on the wrong lead. This is specially common among novice horses and riders. For the horse to canter onto the correct lead, it must be evident for him where your weight is as this will make him step under your center of gravity to maintain his balance. The canter aids usually include application of the inside leg on the girth, and the outside leg behind the girth. The inside leg asks for impulsion, and the outside leg asks the horse's outside hind leg to step forward into canter. To send the message to the horse clear from misunderstandings, shift your weight to your inside seat bone as you apply your leg aids. Be careful not to collapse at the waist or the shoulders. The horse will step under your weight, and therefore canter on the inside lead.
Lateral work: By shifting your center of gravity to one seat bone, you are asking the horse to step underneath your weight. In the half pass, the inside leg is applied on the girth, and the outside leg a few inches behind the girth. The inside leg asks the horse to bend around it and maintain impulsion, while the outside leg asks him to step away from it. The inside rein gently asks the horse to look to the inside, while the outside rein supports the shoulders from falling behind. The purpose of the inside seat bone comes when you want the horse to step sideways. It's true that the outside leg is already asking the horse to step sideways, but shifting your weight to the inside seat bone enhances the sideway action as the horse is more able to maintain his balance.
Turning: Try this:
Ride your horse in walk towards the rail of the arena or towards a wall. Ensure that your contact with his mouth is very light, and keep your hands very still. A little slack in the reins would guarantee that your hands are in no way interfering with the horse. As you approach the rail or wall, the horse will begin to wonder to which direction you wish to go and will keep his senses alert to your slightest movement. This is when the horse is actually eagerly waiting for instruction. Approximately 4 strides from the rail or wall, shift your weight to the right (or the left, if you wish to go to the left). The horse will immediately step to that direction. This goes only as far as proving that horses do sense and respond to seat aids, but it comes in handy when riding circles, serpentines, turns on the forehand or on the haunches, and lateral work.
Collection
Once you have achieved a deep balanced seat, you will be able to easily collect your horse. Collection is a natural state for horses and should never be viewed as a restraining or artificial gait. A horse can start collecting as early as the age of five. Collection makes the horse more responsive and attentive, which brings about a more smooth ride.
Collection is all about contained energy. Unlike extensions, where the energy is directed forward, collection directs the energy upwards. The horse covers less ground with every stride, elevates his steps, and contracts his outline. When the horse has engaged his hind legs and elevated his forehand, he will be lighter in your hand and possibly twice as responsive since engagement of the hocks makes tasks all so much easier for him.
The Role Of The Seat Bones In Collection
The seat bones can be used to collect the horse just as they were used to extend a pace. Remember that the legs initiate the energy, and the seat controls the flow. To direct the energy upwards instead of forwards, reverse the action of the seat described for extending. Instead of tilting the pelvis backwards, contract the muscles in the small of your back to tilt the pelvis slightly forward, lifting the weight from the seat bones to the crotch. This position has the effect of pulling the horse together by concentrating the energy in the hocks.
Never pull on the reins to collect the horse, gently play with the reins to relax his jaw. Forcing the horse on the bit with the reins does no good to the horse or to your hands. By regulating the energy from the back to the front of the horse, he will naturally flex at the pole with little interference from the reins.
Be patient with your horse. It might take a while before he is able to engage his hind legs and collect, so be willing to compromise. Remember to praise your horse lavishly every time he is responsive.
Conclusion
Problems arise when the horse and rider misunderstand each other. The classical seat is one way to overcome the misunderstandings and establish a clear distinguished language. The horse gets his inspiration from you, not from watching other horses and riders. Be his guide, not his boss. Give him a seat that will make him happy, balanced, and comfortable. The classical seat is the key to a prosperous new future for riding. For your sake, and for the horse's sake, use it; it will unlock many doors that were once thought closed forever.
